


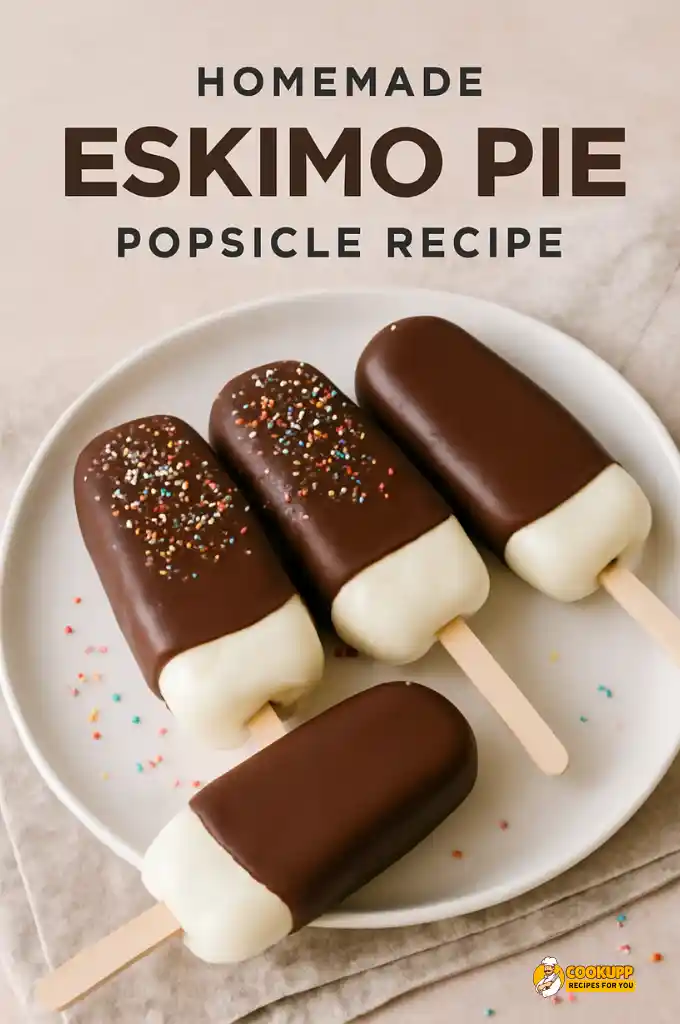
Love chocolate and ice cream on a stick? You’re in for a treat! This Eskimo Pie Popsicle recipe is a fun, beginner-friendly way to bring back the classic joy of biting into those creamy Eskimo Pie ice creams—but made right at home. I’ve tried many frozen desserts, but this one takes me straight to childhood summers and sticky fingers.
If you’ve been looking for the best homemade Eskimo Pie Popsicle recipe that’s simple, nostalgic, and super satisfying, you’re in the right place. Let’s turn your kitchen into a popsicle-making paradise—grab your molds and let’s get started!
What is an Eskimo Pie Popsicle?
If you’ve ever had one of those classic Eskimo Pie ice creams, you already know the magic: creamy vanilla wrapped in a snap-worthy chocolate shell. Now, imagine that same nostalgic flavor, but on a stick. That’s the joy of an Eskimo Pie ice creams. The original Eskimo Pie recipe dates back to the 1920s. It was the first chocolate-covered ice cream bar ever sold in the U.S.—a frozen treat that changed dessert forever.
But today, with a few ingredients and a little freezer space, you can recreate that magic at home with this homemade Eskimo Pie Popsicle recipe. What makes it extra fun? You can get creative with it! Traditional Eskimo Pie Popsicle flavors are vanilla and chocolate, but you’re free to add your twist—whether it’s crushed nuts, swirls of caramel, or even a sprinkle of sea salt on top of that silky Popsicle chocolate coating. It’s your freezer, your rules!
What Makes an Eskimo Pie Popsicle So Special?
It starts with one bite. Cold, sweet vanilla meets a crisp chocolate shell. It’s smooth, rich, and full of joy. That’s the charm of an Eskimo Pie Popsicle. These treats feel like summer and fun all in one. You don’t need to go to a store. You can make them at home with just a few steps.
This Eskimo Pie ice creams recipe is simple and a lot of fun. Want it extra chocolatey? Dip it twice. Like it sweet and salty? Add a pinch of sea salt on top. It’s easy to make it your own. That’s why many say it’s the best homemade Eskimo Pie Popsicle recipe—because it’s made just the way you like it.
Ingredients for Eskimo Pie Popsicles
For the Vanilla Ice Cream Base:
- 2 cups heavy whipping cream
- 1 cup whole milk
- ¾ cup granulated sugar
- 2 teaspoons pure vanilla extract
- Pinch of salt
For the Chocolate Coating:
- 1½ cups semi-sweet chocolate chips or chopped chocolate
- 3 tablespoons vegetable oil
Equipment and Tools Required
- Popsicle Molds
- Wooden Popsicle Sticks
- Microwave-Safe Bowl or Double Boiler
- Spoon or Spatula
- Parchment Paper
- Measuring Cups & Spoons
- Freezer Space
Cooking time
- Prep Time: 20 minutes
- Freezing Time: 4 hours (or overnight)
- Total Time: 4 hours 20 minutes
- Servings: 6 popsicles
How to Make Eskimo Pie Popsicle Recipe
Let’s make magic happen! Follow these easy steps for the best homemade Eskimo Pie Popsicle you’ve ever tasted.
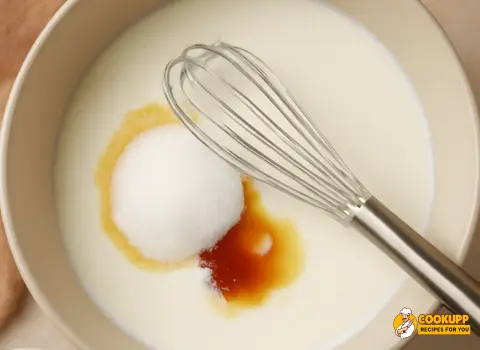
Step 1: Whip Up the Vanilla Base: Grab a big bowl. Pour in the cream, milk, sugar, vanilla, and salt. Whisk until smooth—no lumps! Taste it. Sweet enough? Perfect. This creamy mix is your Eskimo Pie heart.
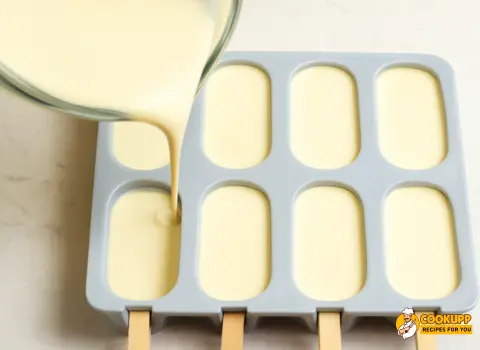
Step 2: Freeze like a Pro: Pour the mix into Popsicle molds. Leave a little space at the top—it expands! Stick the Popsicle sticks. Freeze for 4 hours, or until the mixture is solid. Patience is key here.
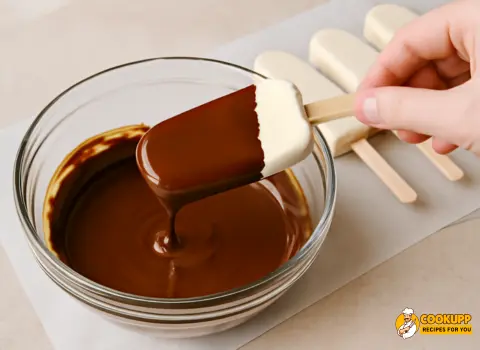
Step 3: Melt the Chocolate Coating: When the pops are frozen, melt the chocolate chips and oil together. Microwave in 30-second bursts, stirring each time. Smooth? Good. This Popsicle chocolate dip is what makes it snap perfectly.

Step 4: Dip and Decorate: Pull a Popsicle from its mold. Dip it fast into the chocolate—count to three! Hold it up and let the extra drip off. Want sprinkles? Add them now before the shell hardens.
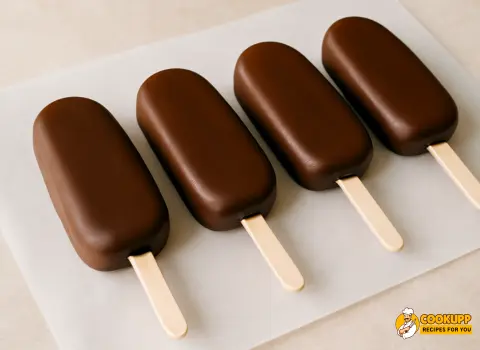
Step 5: Final Freeze: Lay each dipped pop on parchment paper. Freeze for 10 more minutes. That’s it! Your homemade Eskimo Pie Popsicle is ready to devour.
Watch How to Make
Creative Serving Ideas for Eskimo Pie Popsicle Recipe
Now that you’ve mastered the best homemade Eskimo Pie Popsicle, let’s make them even more fun! Here are my favorite ways to serve these frozen treats.
For Kids
- DIY Topping Bar: Lay out sprinkles, crushed cookies, and mini M&Ms. Let kids decorate their own!
- Popsicle Kebabs: Alternate bites with fresh berries for a fruity twist.
- Magic Shell Party: Serve with different melted Popsicle chocolate flavors to dip.
For Parties
- Mini Versions: Use shot glass molds for bite-sized treats.
- Caramel Drizzle: Add ribbons of salted caramel before the chocolate sets.
- Chocolate-Dipped Cones: Stand pops upside-down in ice cream cones for easy holding.
For Grown-Ups
- Espresso Dust: Roll in finely ground coffee beans for a buzz.
- Boozy Version: Add 1 tbsp. Kahlua to the vanilla base.
- Sea Salt Sprinkle: Flaky salt on dark chocolate pure bliss.
Want to try more creative frozen desserts? Check out this beautifully floral Rose Pistachio Cheesecake Ice Cream Recipe — it’s elegant, creamy, and full of Middle Eastern charm.
Tips for the Best Eskimo Pie Popsicles
If you want your Eskimo Pie Popsicle recipe to turn out perfectly, here are a few tips that’ll make a big difference. I’ve learned these the hard way, so you don’t have to!
1. Use High-Quality Chocolate: I can’t stress this enough! The chocolate coating is what makes or breaks the Popsicle. Opt for semi-sweet chocolate chips or chopped chocolate with a high cocoa percentage. The better the chocolate, the better the texture and flavor of the coating will be. Trust me, it’s worth the extra effort!
2. Work Quickly to Prevent Melting: When you’re dipping the popsicles in chocolate, you want to move fast! If the popsicles start to melt, the coating won’t set as nicely. I like to dip each one, then hold it up for a second to let the excess chocolate drip off. It helps the chocolate harden perfectly.
3. Experiment with Different Ice Cream Flavors: The best part about this Eskimo Pie Popsicle recipe is that it’s customizable! While traditional vanilla is classic, don’t be afraid to try other ice cream flavors. Mint, strawberry, or even coffee-flavored ice cream can add a unique twist. Have fun with it!
4. Dairy-Free Options Work Too: If you’re looking for a dairy-free option, this recipe is easily adaptable. Substitute the heavy cream and milk with your favorite dairy-free alternatives, such as coconut cream and almond milk. You can still get that creamy texture and delightful taste, minus the dairy!
5. Let the Chocolate Set before Freezing: After dipping, let your popsicles sit for a few minutes to allow the chocolate to harden slightly before returning them to the freezer. This gives the chocolate a chance to set properly, ensuring a crisp and snappy shell when you take that first bite.
How to Store Homemade Eskimo Pie Popsicles
To keep your homemade Eskimo Pie ice creams fresh and delicious, follow these simple storage tips:
- Wrap Individually: Once the popsicles are completely frozen, wrap each one in parchment or wax paper. This helps prevent them from sticking together and keeps them fresh.
- Use an Airtight Container: After wrapping, place the popsicles in an airtight container or a freezer-safe zip-top bag. This will protect them from freezer burn and keep them tasting great.
- Label & Date: If you’re making a batch to store, it’s a good idea to label the container with the date so you know when they were made. They should stay fresh for 2-3 weeks.
- Keep in the Freezer: Always store your popsicles in the freezer. Ensure your freezer is set to the correct temperature (around 0°F or -18°C) to maintain their texture.
FAQs on Eskimo Pie Popsicle Recipe
How long do Eskimo Pie Popsicles keep?
These popsicles can last 2-3 weeks in the freezer when stored properly in an airtight container or wrapped in parchment paper.
Can I use a different chocolate for the coating?
Yes! You can use dark, milk, or even white chocolate instead of semi-sweet chocolate. Adjust the sweetness to your taste.
What if I don’t have Popsicle molds?
No worries! You can use small cups, ice cube trays, or even shot glasses as molds. Just make sure the sticks stay upright while freezing.
Can I make these without coconut oil?
Yes, you can substitute coconut oil with vegetable oil or omit it altogether. The chocolate coating will still work, though it may not be as shiny.
Can I add toppings to the chocolate coating?
Absolutely! Add crushed nuts, sprinkles, or sea salt before the chocolate hardens for an extra layer of flavor and texture.
How do I prevent the popsicles from sticking to the molds?
Lightly grease the molds with cooking spray or vegetable oil to facilitate easier removal after freezing.
Can I make these popsicles dairy-free?
Yes! Simply swap out the heavy cream and milk with coconut cream and a dairy-free milk like almond or oat milk.
How do I dip the popsicles in chocolate without making a mess?
Hold the Popsicle by the stick and dip it quickly into the chocolate. Let the excess drip off before setting it on parchment paper.
Can I make mini Eskimo Pie Popsicles?
Yes! You can use smaller molds for bite-sized versions. Adjust the freezing time accordingly based on the size of each item.
What’s the best way to store leftover popsicles?
Wrap them individually in parchment paper and store them in an airtight container in the freezer. This keeps them fresh and prevents them from sticking together.
Conclusion
This Eskimo Pie Popsicle recipe is a must-try! It’s simple, affordable, and customizable to fit your tastes. Additionally, it’s a fun way to enjoy a nostalgic treat made right in your own home. Skip the store-bought version and make your own, adding as much chocolate and toppings as you like!
Have questions or feedback? We’d love to hear from you! Don’t forget to follow Cookupp on Pinterest for a delicious mix of inspiring recipes you’ll want to try again and again!