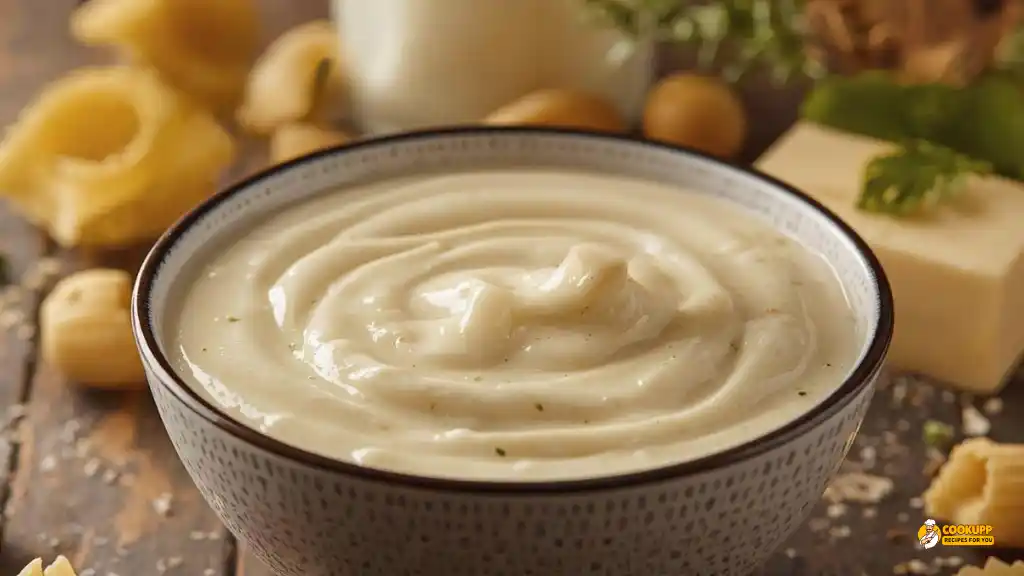


If you’ve ever been to Costa Vida, you know their queso is more than just cheese—it’s pure comfort in a bowl. The creamy, melt-in-your-mouth texture with a hint of spice is what makes it unforgettable. Lucky for you, I’ve cracked the code to the perfect Costa Vida queso recipe, so you can recreate that magic right in your kitchen.
Whether you’re hosting a Taco Tuesday or just craving something warm and cheesy, this easy, copycat recipe will hit the spot. And if you’re looking for another flavorful dip to spice things up, try this Harold’s Mild Sauce.
What Makes Costa Vida Queso So Special?
There’s something about Costa Vida’s queso that makes it stand out from all the rest. It’s not just any dip—it’s a smooth, velvety blend of cheese and spices that transforms any meal into something special. What makes it unique is the combination of creamy Monterey Jack and cheddar cheeses, along with the perfect touch of heat from green chilies. It’s not too spicy, but just enough to keep you coming back for more.

Whether you drizzle it over tacos, pair it with crispy tortilla chips, or pour it over a warm burrito, Costa Vida queso takes your meal from good to amazing. And if you’re in the mood to add even more bold flavor to your spread, try this Pickled Cherry Peppers for a tangy kick that pairs perfectly with queso.
Ingredients for Costa Vida Queso Recipe
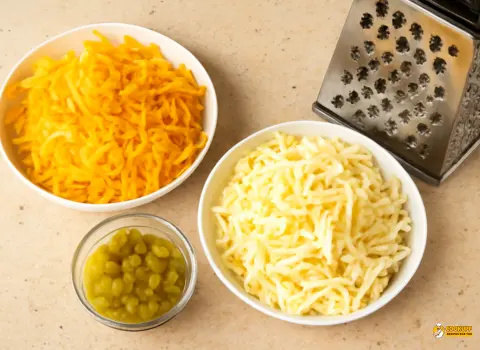
Making Costa Vida queso at home is simpler than you might think! With just a handful of ingredients, you can recreate that creamy, cheesy goodness in your own kitchen. Here’s what you’ll need:
- 1 cup Cheddar Cheese, shredded
- 1 cup Monterey Jack Cheese, shredded
- 1 cup Heavy Cream
- 1 can (4 oz) Green Chilies, diced
- ½ tsp Garlic Powder
- ½ tsp Onion Powder
- ½ tsp Cayenne Pepper (optional for extra heat)
- Salt and Pepper, to taste
Equipment and Tools
Before you dive into making that cheesy masterpiece, let’s gather the essentials! You don’t need fancy equipment, just a few basics to get the job done:
- Medium-sized saucepan
- Whisk or wooden spoon
- Grater
- Can opener
Cooking Time and Serving People
- Prep Time: 5 minutes
- Cook Time: 15 minutes
- Total Time: 20 minutes
- Servings: 6 people
How to Make Copycat Costa Vida Queso Recipe
Making Copycat Costa Vida queso at home is surprisingly easy and doesn’t take much time. Follow these simple steps, and you’ll be enjoying creamy, cheesy goodness in no time.
Step 1: Prepare the Ingredients: Start by grating the cheddar and Monterey Jack cheeses. While it’s tempting to use pre-shredded cheese, grating it yourself helps the queso melt smoother without any added preservatives. Open the can of green chilies and drain them, then set everything aside. If you’re adding any optional ingredients like jalapeños or diced tomatoes, get those ready as well.
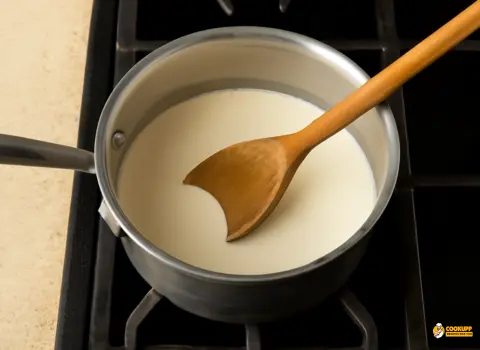
Step 2: Heat the Heavy Cream: In a medium-sized saucepan, pour in the heavy cream and place it over low to medium heat. Stir it gently as it begins to warm up, but don’t bring it to a boil—just let it heat until its smooth and warmed through. This is key to achieving that creamy texture.
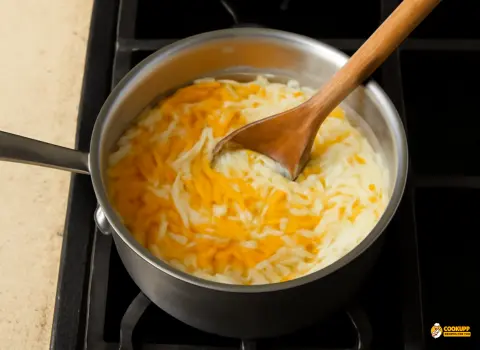
Step 3: Melt the Cheese: Once the cream is warm, start adding the shredded cheddar and Monterey Jack cheese in batches. Stir constantly to help the cheese melt evenly and prevent it from clumping. Be patient! This process should be slow and steady to ensure the cheese melts completely and doesn’t separate. Keep stirring until the queso is smooth and velvety.
Step 4: Add the Spices and Chilies: Now, it’s time to add the flavors. Sprinkle in the garlic powder, onion powder, and cayenne pepper. Stir them in well. If you like your queso on the spicier side, this is when you can throw in some diced jalapeños or extra cayenne for more heat. Add the green chilies at this point, too—give everything a good stir to combine.

Step 5: Adjust the Consistency: If the queso gets too thick, don’t worry! Just add a little more cream or milk, a tablespoon at a time, until it reaches the perfect smooth, pourable consistency. Keep stirring as you add, and adjust the seasoning as needed.
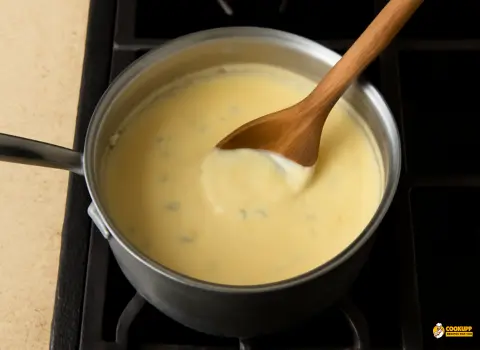
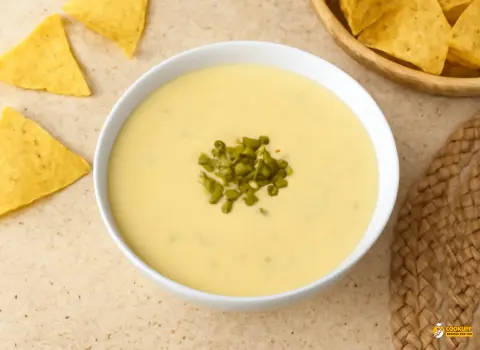
Step 6: Serve and Enjoy: Once the queso is at the perfect consistency and flavor, remove it from the heat. It’s now ready to serve! Pour it into a bowl or drizzle it over your favorite dishes. Whether you’re enjoying it with crispy tortilla chips, on tacos, or over nachos, this queso will take your meal to the next level.
Creative Serving Ideas for Costa Vida Queso Recipe
Now that your Costa Vida queso is ready, it’s time to get creative with how you serve it! Here are a few fun and delicious ways to enjoy your homemade queso:
1. Taco Night The Ultimate Pairing: One of the best ways to enjoy Costa Vida queso is by pouring it over tacos. Imagine your favorite fillings like seasoned beef, chicken, or even Costa Vida sweet pork, topped with the rich, creamy queso. It’s a match made in heaven! For extra flavor, serve with fresh salsa, guacamole, and a squeeze of lime.
2. Nacho bar A Party Favorite: Turn your queso into the star of a nacho bar. Lay out a spread of tortilla chips and top them with your homemade queso. Then, let everyone load up their nachos with toppings like diced tomatoes, jalapeños, shredded lettuce, sour cream, and black olives. You can even add some grilled chicken or Costa Vida sweet pork for a heartier snack.
3. Queso Fries A Delicious Twist: If you’re craving something a little different, drizzle your queso over a plate of crispy fries. The cheesy, spicy sauce will turn your regular fries into an indulgent treat. Top with chopped green onions, bacon bits, or jalapeños for an extra kick.
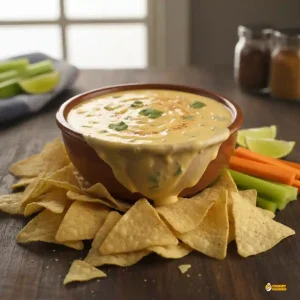
4. Queso Dip for Chips and Veggies: For a simple but irresistible snack, serve your Costa Vida queso as a dip with tortilla chips or fresh veggies like celery, carrots, and bell peppers. It’s the perfect appetizer for game nights or casual gatherings with friends and family.
5. Over a Burrito or Burrito Bowl: Give your burrito or burrito bowl an extra layer of richness by pouring the queso over the top. Whether you’re making a chicken burrito, a beef burrito, or a vegetarian bowl, the creamy queso adds that final touch that will have everyone reaching for seconds.
6. As a Topping for Grilled Meats: For something a little more unique, drizzle Costa Vida queso over grilled meats like chicken, steak, or even fish tacos. The warm queso pairs beautifully with the smoky flavors of grilled meat, creating a delicious balance of textures and tastes.
7. Breakfast Queso: Why not start your day with something cheesy? Pour your queso over scrambled eggs or breakfast burritos. For added flair, top with sautéed onions, peppers, and some fresh cilantro. This makes for a cozy, comforting breakfast or brunch.
Cookupp Community Tips for Costa Vida Queso Recipe
Here are a few tips from the Cookupp Community to help you make the perfect Costa Vida queso, just like a pro:
1. Avoid Curdling: To keep your queso smooth and creamy, make sure to melt the cheese over medium-low eat. If the heat’s too high, you risk it separating or becoming grainy. Take your time, and the results will be worth it!
2. Adjust the Heat: If you love spicy food, add a few extra jalapeños or a dash of chili powder to give the queso a kick. For a milder version, go easy on the cayenne pepper and chilies. You can always taste as you go and adjust to your liking!
3. Shredded vs. Pre-Shredded Cheese: While pre-shredded cheese is convenient, it often contains anti-caking agents that can affect the texture. For the best smooth queso, go for block cheese and shred it yourself. It makes a big difference in the final texture.
4. Make-Ahead Tips: If you’re preparing for a busy day or a gathering, make the queso ahead of time. Just store it in an airtight container in the fridge. When you’re ready to serve, reheat it gently on the stovetop with a splash of cream or milk to bring it back to that creamy texture.
5. Vegan Options: If you’re looking to make Costa Vida vegan options, simply swap the heavy cream for coconut cream or a plant-based cream, and use dairy-free cheeses. You won’t lose out on the creamy texture, and the flavor will still be delicious.
How to Store Leftover Costa Vida Queso Recipe
Got some leftovers? Don’t worry—you can easily store and enjoy your Costa Vida queso again later!
- Refrigeration: Let the queso cool to room temperature, then transfer it into an airtight container. Store it in the fridge for up to 3-4 days. It’ll still taste amazing when you’re ready to dig in again!
- Reheating: When it’s time to enjoy your leftovers, gently reheat the queso on the stovetop over low heat. Stir occasionally and add a splash of cream or milk to bring it back to that smooth, creamy texture. If you’re in a hurry, the microwave works too—just heat in short bursts, stirring in between.
- Freezing: If you want to keep the queso longer, you can freeze it, though keep in mind that the texture may change slightly when reheated. Store it in a freezer-safe container for up to 2 months. When ready to use, thaw it in the fridge overnight and reheat as usual.
Costa Vida Queso Recipe
Equipment
- Medium-sized saucepan
- Whisk or wooden spoon
- Grater
- Can opener
Ingredients
- 1 cup Cheddar Cheese shredded
- 1 cup Monterey Jack Cheese shredded
- 1 cup Heavy Cream
- 1 can 4 oz Green Chilies, diced
- ½ tsp Garlic Powder
- ½ tsp Onion Powder
- ½ tsp Cayenne Pepper optional for extra heat
- Salt and Pepper to taste
Instructions
- Prepare the Ingredients: Start by grating the cheddar and Monterey Jack cheeses. While it’s tempting to use pre-shredded cheese, grating it yourself helps the queso melt smoother without any added preservatives. Open the can of green chilies and drain them, then set everything aside. If you’re adding any optional ingredients like jalapeños or diced tomatoes, get those ready as well.
- Heat the Heavy Cream: In a medium-sized saucepan, pour in the heavy cream and place it over low to medium heat. Stir it gently as it begins to warm up, but don’t bring it to a boil—just let it heat until its smooth and warmed through. This is key to achieving that creamy texture.
- Melt the Cheese: Once the cream is warm, start adding the shredded cheddar and Monterey Jack cheese in batches. Stir constantly to help the cheese melt evenly and prevent it from clumping. Be patient! This process should be slow and steady to ensure the cheese melts completely and doesn’t separate. Keep stirring until the queso is smooth and velvety.
- Add the Spices and Chilies: Now, it’s time to add the flavors. Sprinkle in the garlic powder, onion powder, and cayenne pepper. Stir them in well. If you like your queso on the spicier side, this is when you can throw in some diced jalapeños or extra cayenne for more heat. Add the green chilies at this point, too—give everything a good stir to combine.
- Adjust the Consistency: If the queso gets too thick, don’t worry! Just add a little more cream or milk, a tablespoon at a time, until it reaches the perfect smooth, pourable consistency. Keep stirring as you add, and adjust the seasoning as needed.
- Serve and Enjoy: Once the queso is at the perfect consistency and flavor, remove it from the heat. It’s now ready to serve! Pour it into a bowl or drizzle it over your favorite dishes. Whether you’re enjoying it with crispy tortilla chips, on tacos, or over nachos, this queso will take your meal to the next level.
Video
Notes
- For extra spice, add chopped jalapeños or hot sauce.
- To make dairy-free, substitute heavy cream with coconut cream and use dairy-free cheese.
- Store leftover queso in an airtight container in the fridge for up to 3-4 days. Reheat with a splash of milk or cream to restore its smooth texture.
FAQs about Costa Vida Queso Recipe
Got questions about making the perfect Costa Vida queso? Here are some common ones answered to help you along the way:
What is in Costa Vida queso?
Costa Vida queso is a creamy, flavorful cheese dip made from a blend of cheddar and Monterey Jack cheeses, heavy cream, green chilies, and spices like garlic powder, onion powder, and cayenne pepper. The result is a smooth and slightly spicy dip that pairs perfectly with tacos, nachos, or tortilla chips.
What ingredients are needed for queso?
To make Queso, you’ll need cheddar cheese, Monterey Jack cheese, heavy cream, green chilies, and seasonings like garlic powder, onion powder, and cayenne pepper. You can also add jalapeños or salsa for extra flavor, depending on your heat preference.
What is the secret ingredient to good cheese dip?
The secret to a great cheese dip is using a combination of cheeses that melt well, like cheddar and Monterey Jack. Heavy cream makes the queso smooth and creamy, while the green chilies add a mild heat. The right balance of spices, like garlic and cayenne, is what brings it all together.
What’s the secret to smooth queso?
The key to smooth queso is melting the cheese slowly over medium-low heat. Stir constantly to prevent clumping, and add heavy cream to ensure the queso stays creamy and smooth. Avoid overheating the cheese, as that can cause it to separate and become grainy.
Why is it called queso?
Queso is the Spanish word for cheese. In many Mexican and Tex-Mex dishes, it refers to a creamy cheese dip made with melted cheese and various seasonings. It’s popular in restaurants as a dip for chips, a topping for tacos, and an addition to other dishes.
Is Costa Vida Queso healthy to eat?
Traditional queso is high in fat and calories, mainly due to the cheese and heavy cream. While it’s delicious, it’s best enjoyed in moderation, especially if you’re mindful of your calorie intake. You can make a lighter version by using reduced-fat cheese or dairy-free alternatives.
Can I freeze leftover Costa Vida queso?
Yes, you can freeze leftover queso, but keep in mind the texture may change slightly after freezing. To freeze, store the queso in an airtight container for up to 2 months. When reheating, add a splash of cream or milk to restore the smooth texture.
Can I make this queso dairy-free?
Yes, to make dairy-free queso, you can substitute heavy cream with coconut cream or a non-dairy milk, and use dairy-free cheese. There are plenty of plant-based options available to maintain the creamy texture and delicious flavor of the queso.
Can I use a different type of cheese for the queso?
Absolutely! While cheddar and Monterey Jack are traditional, you can experiment with different cheeses like pepper jack for more heat, or gouda for a smoky flavor. Just make sure to choose cheeses that melt well for the best consistency.
Do you put butter in queso?
Traditional Costa Vida queso doesn’t require butter. The creaminess comes from heavy cream and melted cheese. However, some recipes may add a little butter to enhance the richness. It’s optional, and you can skip it if you prefer a lighter dip.
Conclusion
Making Costa Vida queso at home is easier than you think, and the result is a rich, creamy dip that’s sure to become a crowd favorite. With just a few ingredients and a little patience, you can recreate the restaurant-style queso right in your kitchen. Whether you’re serving it with tacos, nachos, or just enjoying it with chips, this queso will elevate any meal. Don’t be afraid to experiment with flavors, whether you add more spice or make it dairy-free—make it your own! Now that you’ve got the recipe, it’s time to get cooking and enjoy every cheesy bite. Happy dipping!
Have questions or feedback? We’d love to hear from you! Don’t forget to follow Cookupp on Pinterest for a delicious mix of inspiring recipes you’ll want to try again and again!