


Introduction: The Unsung Hero of Home Electrical Safety
When you think about protecting your home, your mind probably goes straight to smoke detectors or security systems. But what about the silent, essential guardian of your electrical system? We’re talking about the Ground Fault Circuit Interrupter, or GFCI.
Learning the ropes of GFCI outlet installation is one of the most valuable DIY skills a homeowner can acquire. It’s not just about compliance; it’s about preventing a tragedy.
A GFCI is a specialized, fast-acting circuit breaker. Its job is to constantly monitor the flow of electricity. If it detects even a tiny imbalance—a “ground fault”—it trips the power in milliseconds.
This rapid response is what saves lives. It prevents severe electrical shocks and electrocution, especially in areas where water and electricity are close companions.
That’s why electrical codes are strict: you need GFCIs in kitchens, bathrooms, laundry rooms, garages, and all outdoor receptacles. It’s a small device with a massive responsibility.
H2Before You Start: Tools, Materials, and the Safety Checklist
Any successful electrical project starts long before the first wire is touched. Meticulous preparation is the foundation for a safe and efficient GFCI outlet installation.
H3Gathering Your Arsenal of Tools
You don’t need a massive toolbox for this job, but the right gear is essential. Make sure you have a new GFCI receptacle, a flathead and Phillips screwdriver, and a reliable non-contact voltage tester.
A wire stripper/cutter is also a must-have for clean connections, and a bit of electrical tape can come in handy for marking wires. Always check that your tools are in good shape before you begin.
H3The Non-Negotiable Safety Step
This is the most critical instruction: always turn off the power at the main breaker panel. Locate the breaker that controls the outlet you’re working on and flip it to the “Off” position.
Never assume the power is off. Use your non-contact voltage tester to confirm that the wires in the electrical box are completely de-energized. Test the old outlet one last time by plugging in a lamp or using the tester directly on the terminals. Safety first, always.
H2Decoding the GFCI: Understanding LINE and LOAD
A standard outlet is simple, but a GFCI has a crucial distinction that trips up many first-time installers: the difference between the LINE and LOAD terminals. Getting this wrong is the most common mistake in GFCI outlet installation.
The LINE terminals are where the power comes in. These are the wires running directly from your circuit breaker. You must connect the incoming power to these terminals for the GFCI unit to function.
The LOAD terminals are where the power goes out. They are protected by the GFCI’s internal breaker. If you connect other outlets downstream to these terminals, they will also gain GFCI protection.
If you only want to protect the single outlet you are installing, leave the yellow tape covering the LOAD terminals in place. This is the simplest and safest approach for most DIYers.
H2The Step-by-Step GFCI Outlet Installation Process
With your safety checks complete and your understanding of the terminals solid, you are ready for the physical installation. Take your time and follow these steps precisely.
H3Removing the Old Receptacle
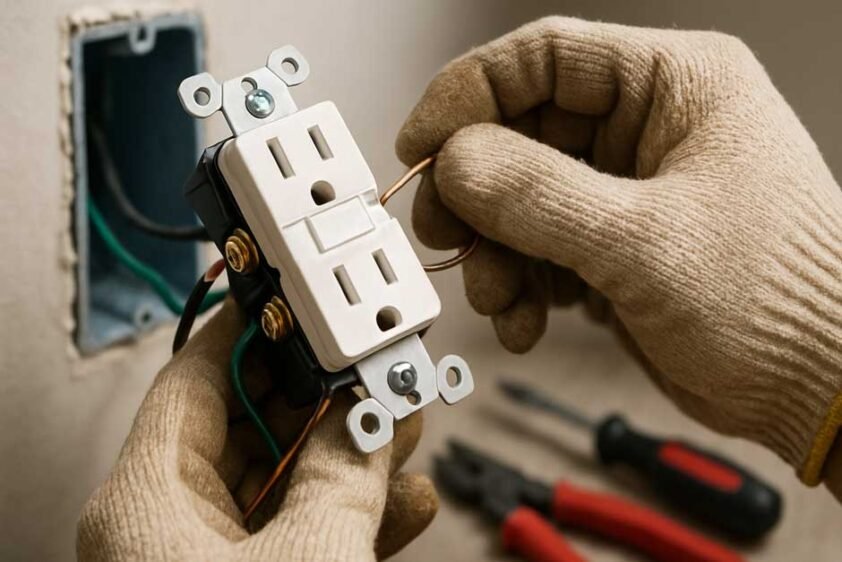
With the power confirmed off, remove the faceplate and unscrew the old receptacle from the electrical box. Gently pull the old unit out to expose the wiring.
Before disconnecting anything, take a moment to observe and mentally note the wiring configuration. Typically, you’ll see a black (hot), white (neutral), and bare or green (ground) wire. Now, carefully disconnect these wires.
H3Connecting the LINE Wires
Identify the wires that carry the incoming power—your LINE wires. Connect the black (hot) wire to the brass or dark-colored LINE terminal screw.
Next, connect the white (neutral) wire to the silver or light-colored LINE terminal screw. Finally, ensure the bare copper or green ground wire is securely connected to the green ground screw.
H3Handling the LOAD Wires (If Applicable)
If you are using this GFCI to protect other outlets down the line, you will connect the downstream wires to the LOAD terminals. The downstream black wire goes to the brass LOAD screw, and the downstream white wire goes to the silver LOAD screw.
Remember, if you are only protecting this single outlet, leave the yellow tape on the LOAD terminals. Tuck any unused downstream wires safely into the back of the box, capped with wire nuts if necessary.
H3Finalizing and Testing the Installation
Gently fold the wires back into the electrical box, making sure they aren’t pinched. Screw the new GFCI outlet into the box and secure the faceplate.
Now for the moment of truth: return to the breaker panel and restore power. Press the “RESET” button on the GFCI. To test, plug a lamp into the outlet to confirm power, then press the “TEST” button. The power should immediately trip off with an audible click. Press “RESET” again to restore power. A successful test means a safe installation.
H2Troubleshooting and Maintenance
Even the most careful GFCI outlet installation can run into a snag. Knowing how to troubleshoot common issues is part of the DIY process.
A common headache is a GFCI that refuses to reset. The first thing to check is the breaker—is the power truly on? The second is the wiring—have you accidentally reversed the LINE and LOAD connections? This is the most frequent culprit.
If the GFCI trips immediately after you press “RESET,” it means it’s doing its job: there is a ground fault or a short circuit somewhere. Try disconnecting the LOAD wires. If the GFCI resets, the fault is in the downstream circuit, not the GFCI itself.
For maintenance, remember that GFCIs have a lifespan. Most manufacturers recommend testing them monthly by pressing the “TEST” button. If the device fails to trip, or if the indicator light is blinking red, it’s time for a replacement.
H2Frequently Asked Questions (FAQ) about GFCI Outlet Installation
H3Q1: How do I know if I need a GFCI outlet?
Electrical codes mandate GFCI protection in all wet or damp locations. This includes any outlet within six feet of a sink, bathtub, or shower, as well as all outlets in garages, unfinished basements, crawl spaces, and outdoors. If water is a possibility, a GFCI is a necessity.
H3Q2: Can I install a GFCI outlet myself?
Absolutely. A homeowner with basic electrical knowledge and a strict adherence to safety protocols can perform a GFCI outlet installation. However, if you feel uncertain at any point, or if you are dealing with a complex wiring situation, always call a licensed electrician.
H3Q3: What is the difference between a GFCI outlet and a GFCI breaker?
A GFCI outlet protects itself and any outlets connected to its LOAD terminals. A GFCI breaker, which is installed in your main electrical panel, protects the entire circuit, including all lights and outlets on that circuit. Both offer the same level of ground fault protection.
H3Q4: What does it mean if the GFCI light is red or blinking?
The indicator light is your GFCI’s way of communicating. A solid green light usually means it’s working fine. A red or blinking light typically signals that the device has tripped, or, more seriously, that it has reached its “end-of-life” and can no longer guarantee protection, meaning it must be replaced immediately.
H3Q5: Can I install a GFCI outlet in an older two-wire system (no ground)?
Yes, this is a common and code-compliant solution for older homes. The GFCI will still provide ground fault protection, but the outlet itself will not have a physical ground connection. In this scenario, the outlet must be clearly labeled with “No Equipment Ground” and “GFCI Protected” stickers.